How To Save AWS Costs Using Spotinst
When we speak about migrating our infrastructure to cloud, a few questions that come up are:
1. How much will this cost?
- 2. Can I move my application to the cloud without much effort?
- 3. Is it to build new applications in the cloud?
- 4. How safe is it?
- 5. Are you locked down to a specific cloud platform?
As we know, cost is one of the most important factors while moving to the cloud, in this post we want to share how we optimized costs on AWS using various techniques. We are sure that by following these techniques you can significantly reduce your operating cost of your infrastructure.
Many of us can be skeptical about moving to the cloud, especially because we don’t want to end up spending more. As Haptik is fully hosted on the AWS cloud platform, our cloud infrastructure costs depend on our usage. Most of the cloud platform providers these days offer an “on demand” model of payment. On-Demand model means “pay only for what you use” without any contracts or extra cost which has literally changed the way we host our applications in the cloud.
How are we saving Infrastructure Cost?

We were mostly using AWS On-demand instances for all our applications which over a period of 3 years has cost us significantly lesser than having an on-premise infrastructure. We’ve also had some Reserved Instances that by definition are not flexible due to their fixed terms.
At that point, we decided to start experimenting with AWS Spot Instances in order to see a significantly decreasing in our cloud costs. AWS Spot Instances are “spare” capacity for which AWS allows users to bid for, and whoever bids higher, gets the instance. These instances are available at costs of about 70-80% lower than the normal on-demand instances.
You can read more about spot instances.
We’ve started seeing cost savings of $5000 per month while using the AWS Spot Instances. Though using spot instances saves a lot of cost managing that activity (bidding, maintaining & scaling) was a great hassle, to say the least, not to mention the risks of running production environment on it. We had some scripts that helped us handle the process, but quickly we figured out we have to find a smarter, more efficient and reliable way to manage the operation and to cut off the risks dramatically.
This is where Spotinst comes in.
At Haptik, we are currently saving at least 85% costs on EC2 instances using Spotinst Elastigroup. There are many other features available on the Spotinst platform which we use to improve our performance while keeping the costs down. One such example is checking for Idle resources like unused volumes, instances etc. and releasing them to save costs.

Other highly effective features of Spotinst are:
- 1. Optimizer
- 2. Eco
- 3. Radius
- 4. Mr. Scaler
- 5. Multai
- 6. Functions
So What is Spotinst?
Spotinst is an online cloud management platform which allows companies to run their mission-critical applications and manage their infrastructure while reducing up to 85% costs. Spotinst supports AWS, Azure, Google Cloud & Packet.
Elastigroup is one of Spotinst’s main product which we use at Haptik to manage our virtual servers on AWS.
What is Elastigroup?
Elastigroup’s goal is to manage the Spot instances and thereby providing vast savings. It also helps to manage on-demand servers.
The main drawback of using spot instances market directly (not from Spotinst Elastgroup) is the overhead of bidding and managing the server count 24*7 for your critical operations. This is exactly where Spotinst comes in. Spotinst will launch Spot Instances within the AWS account, the only thing that is needed is AWS account access via IAM. When creating a Spotinst account, the onboarding screens will request general details and you simply have to follow the instructions.
Visit here for a complete guide on how to create Spotinst account.
Setting Up and Using Elastigroup
Without much ado, let’s get started with the Spotinst console. This is how the Spotinst console dashboard looks like:
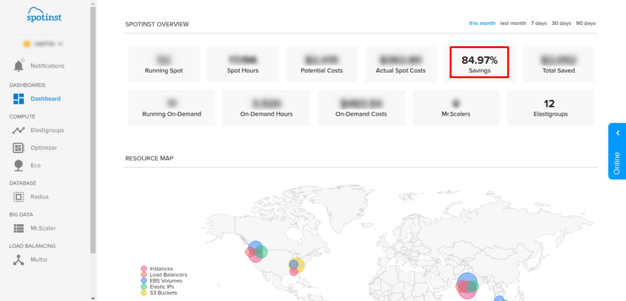
The Dashboard above gives an overview of all the resources you are using, the actual costs and how much have you have saved by using Spotinst.
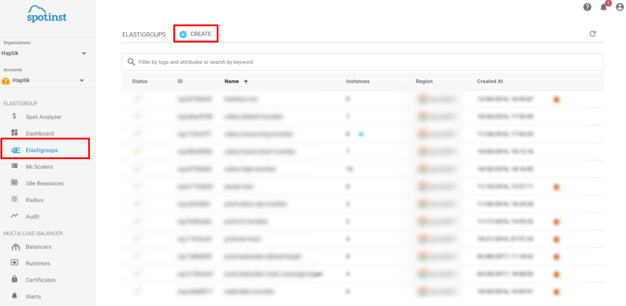
Let’s head on to what Elastigroups is, and how easy it is to set up: go to the Elastigroups page from the left menu: simply click on CREATE, which opens a Setup page:
Next, you can choose from different types of Elastigroups. We will select Web Tier Autoscaling:
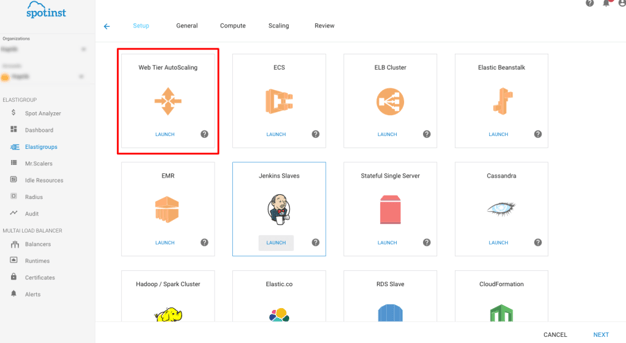
That gives you the options below:
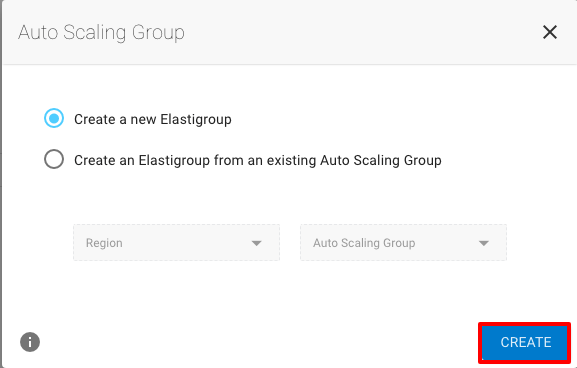
General Settings
The above will open ‘general settings’ form for you to fill and it is displayed as below:
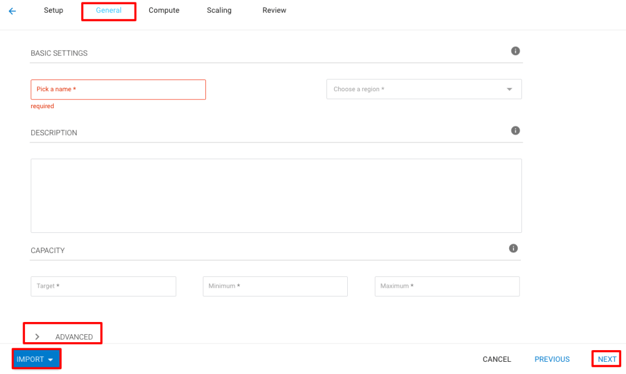
In Elastgroup there are some simple options to fill in and few advanced options that we would like to share:
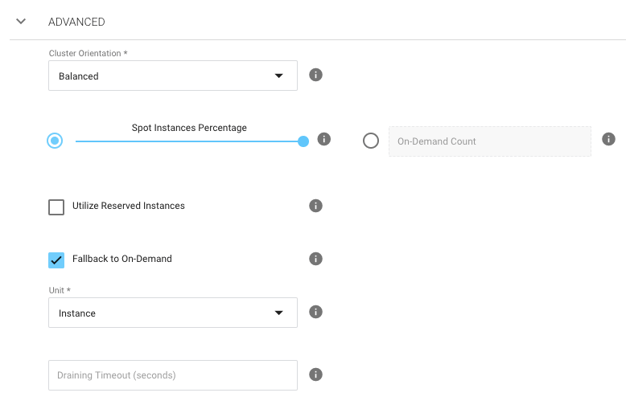
In Cluster Orientation, you get to chooses one of the following:
Cost-Based (Spotinst will choose Spot Instances which are the cheapest), Availability Based (Spot Instances which can be available for a longer period of time) and Balanced Based (mix of the previous two) selection of instances in your Elastigroup.
Another advanced option is Fallback to On-Demand, just in case spot instances are not available you will automatically use On Demand.
In Scheduling, you can set various options like Capacity change etc.
Compute Settings
Click on next and you will see a page as shown below:
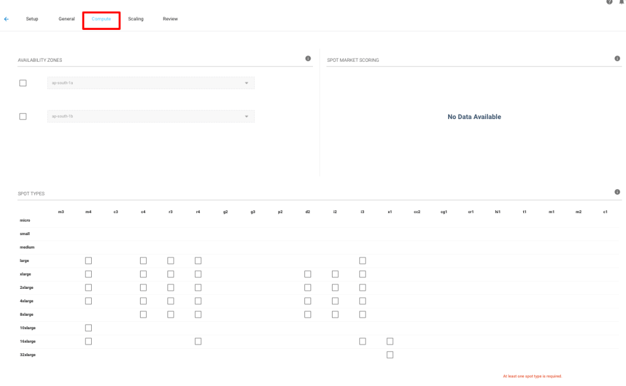
This section is Compute, the most interesting part! It shows how easily Spotinst handles all the computation options using a simple form, I was really impressed. You need to choose the Availability zones, On-demand Instance Type, and Spot Instance type. You can select multiple spot instances. After that:

Here you choose the AMI through which the instance should come up.
If you scroll at the bottom you will see more options as below:

In Additional Configurations, you are given options to choose EBS optimized, Public IP (true or false) etc.
In Stateful, You can select from various options like Persist Root Volume and Persist Data Volume. By choosing those options, Spotinst will take continues snapshots of your instance with the relevant data attached and once they detect an interruption, they will launch a new instance with the same data attached from the latest snapshot.
You can also “Maintain Private IP” of the server. More details.
In Load Balancers, as the name suggests you can choose options related to AWS Elastic Load Balancer.
Also, Spotinst has many Integrations like CodeDeploy, Chef, Kubernetes etc. that you can choose from and remain in your familiar environment.
Scaling Settings
Scaling policies is one important part of managing infrastructure in the cloud and with the help of Spotinst, we can do that quite easily. In autoscaling you can scale up or down as needed and determine your strategy in advance as shown below:
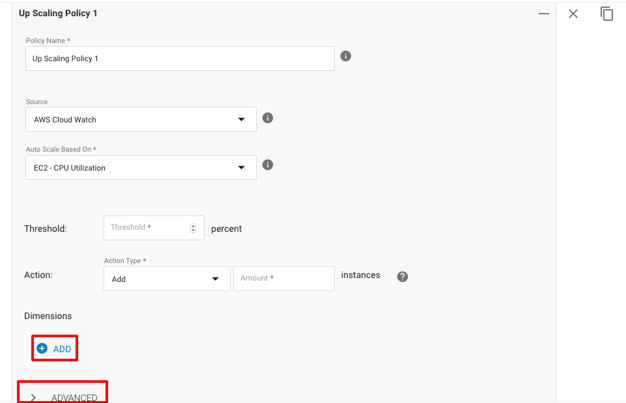
Go through the setting, click create and your Elastigroup is ready. You can see the newly launched instances in your AWS EC2 console. The newly created Elastigroup will now be available on the main Elastigroup page.
Ease of Management
From the left menu, select Elastigroups and it will list you all the Elastigroups. Click on any existing Elastigroup to manage it. Once you click you will be taken to the below screen which is specific to that particular Elastigroup:
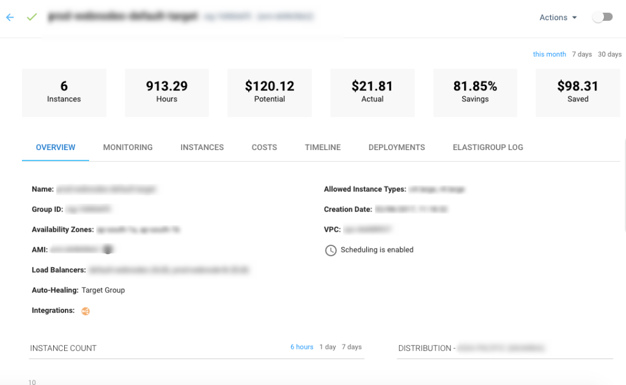
The above shows some basic details for the Elastigroup with stats like Cost Saving, Running Instances, Overview, Monitoring, Instances details, Timeline (Timeline of launched and terminated instances etc.), Deployments and Elastigroup Log. It also displays basic graphs, which give you insights of the Elastigroup performance.
Spotinst has also got a very easy-to-use API, which we use for automated Deployments (daily Blue-Green Deployments). The Spotinst API documentation is available.
That’s how easy it is! We have been using Spotinst for over a year now to manage our AWS account and it is going great so far. We would love to hear from you. Do leave your feedbacks in the comments section.Haptik is hiring. Do get in touch with us at hello@haptik.ai


