

Containerization has drastically changed IT architecture, so Kubernetes has become the most popular DevOps & Infrastructure tool.
At Haptik, we already manage 70+ Kubernetes clusters spread over multiple geographical locations. We believe Kubernetes can be a standard that can run wherever we want, whether on-premises or on the cloud, and we are on a quest to become more cloud-agnostic while also reducing our dependency on cloud-managed orchestration services like ECS, etc.
Though Kubernetes is a widely used tool, using it is not straightforward. The management of your Kubernetes cluster becomes more difficult as it expands. So, we have curated a list of best practices that will help you release to production and make your production environments more stable and secure.
Upgrade to latest version
Your production cluster must always run the latest stable version of Kubernetes. The new releases include many updates, new features, and importantly, patches to previous versions' security flaws. By installing these patches, your cluster is protected from vulnerabilities.
Additionally, older versions are not supported enough by the provider or by the community. Therefore, it is better to update the cluster to the most recent version of Kubernetes.
Seamless upgrades:
Create a continuous upgrade strategy.- Get updates about new K8s versions from your respective cloud providers.
- Test and verify new patches and minor versions.
- Schedule maintenance windows and exclusions
- Set your tolerance for disruption to ensure your workloads have a sufficient number of replicas for your applications, even during maintenance.
- Use a strategy for control & worker node pool upgrades.
Use Namespaces & Labels
By default, there are three different namespaces in Kubernetes in the beginning: default, kube-public, and kube-system. Namespaces are very important in organizing your Kubernetes cluster and keeping it secured from other teams working on the same cluster. If your Kubernetes cluster is large (hundreds of nodes) and multiple teams are working on it, you need to have separate namespaces for each team. For example, you should create different namespaces for development, testing, and production teams. This way, the developer having access to only the development namespace won’t be able to make any changes in the production namespace, even by mistake.
A Kubernetes cluster includes multiple elements like services, pods, containers, networks, etc. Maintaining all these resources and keeping track of how they interact with each other in a cluster is cumbersome. This is where labels come in. Kubernetes labels are key-value pairs that organize your cluster resources.
Resource Management
Ops teams usually want to optimize and maximize the percentage of resources consumed by pods. Resource usage is one such indicator of how optimized your Kubernetes environment actually is. You can consider that an optimized Kubernetes environment is one in which the average CPU usage of the containers running is optimal.
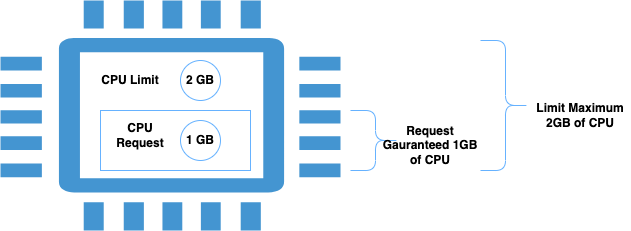
- Resource requests specify the guaranteed minimum amount of resources a container can use.
- Resource limits specify the maximum amount of resources a container can use.
For both requests and limits, it’s typical to define CPU in millicores and memory in megabytes or mebibytes.
Example: If you set a memory request of 256 MiB for a container, and that container is in a Pod scheduled to a Node with 8GiB of memory and no other Pods, then the container can try to use more RAM. If you set a memory limit of 4GiB for that container, the kubelet (and container runtime) enforce the limit. The runtime prevents the container from using more than the configured resource limit.
Health Checks with Liveness and Readiness Probes
Readiness and liveness probes are strongly recommended; it is always better to use them than to forego them. These probes are essentially health checks.
Readiness probe:
Ensures a given pod is up and running before allowing the load to get directed to that pod. If the pod is not ready, the requests are taken away from your service until the probe verifies the pod is up.
Liveness probe:
Verifies if the application is still running or not. This probe tries to ping the pod for a response from it and then check its health. If there is no response, then the application is not running on the pod. The liveness probe launches a new pod and starts the application on it if the check fails.
Use Smaller Container Images
A beginner developer often makes the mistake of going for the base image, which consists of up to 80% of packages and libraries they won’t need. We recommend choosing smaller docker images that take less storage space. This helps you pull and build the image faster. Also, the smaller the docker image, the fewer the chances of security issues.
You can use alpine images (which are almost 10 times smaller than the base image), and then add any necessary packages and libraries required to run your application.
Security using RBAC and Network Policies
Today, everything is hackable, and so is your Kubernetes cluster. Hackers often try to find vulnerabilities in the system in order to exploit them and gain access. The first thing to do is make sure you are using RBAC in Kubernetes. RBAC is role-based access control. Assign roles to each user in your cluster and each service account running in your cluster. Roles in RBAC contain several permissions that a user or service account can perform. You can assign the same role to multiple people and each role can have multiple permissions.
Network policies are nothing but objects that enable you to explicitly state and decide what traffic is permitted and what’s not. This way, Kubernetes will be able to block all other unwanted and non-conforming traffic. Defining and limiting network traffic in clusters is one of the basic and necessary security measures and is highly recommended.
Audit Your Logs Regularly
The logs of any system reveal a lot - you just have to store and analyze them thoroughly. In Kubernetes, auditing the logs regularly is very important in order to identify any vulnerability or threat in the cluster. All the request data made on the Kubernetes API is stored in the audit.log file.
Cluster Monitoring and Logging
Monitoring deployment is critical while working with Kubernetes. It is vital to ensure the configurations, performance, and traffic remain secure. Without logging and monitoring, it is impossible to diagnose issues that happen. To ensure compliance, monitoring and logging become essential.
When it comes to monitoring, it is necessary to set up the logging capabilities on every layer of the architecture. The logs generated will help to enable security tooling, audit functionality, and analyze performance.
Refer to our amazing blog to read more about Haptik’s Centralized Logging & Alerting System.

Enable the Use of Auto Scalers
Kubernetes has three auto-scaling abilities for deployments: horizontal pod autoscaler (HPA), vertical pod autoscaler (VPA), and cluster autoscaling.
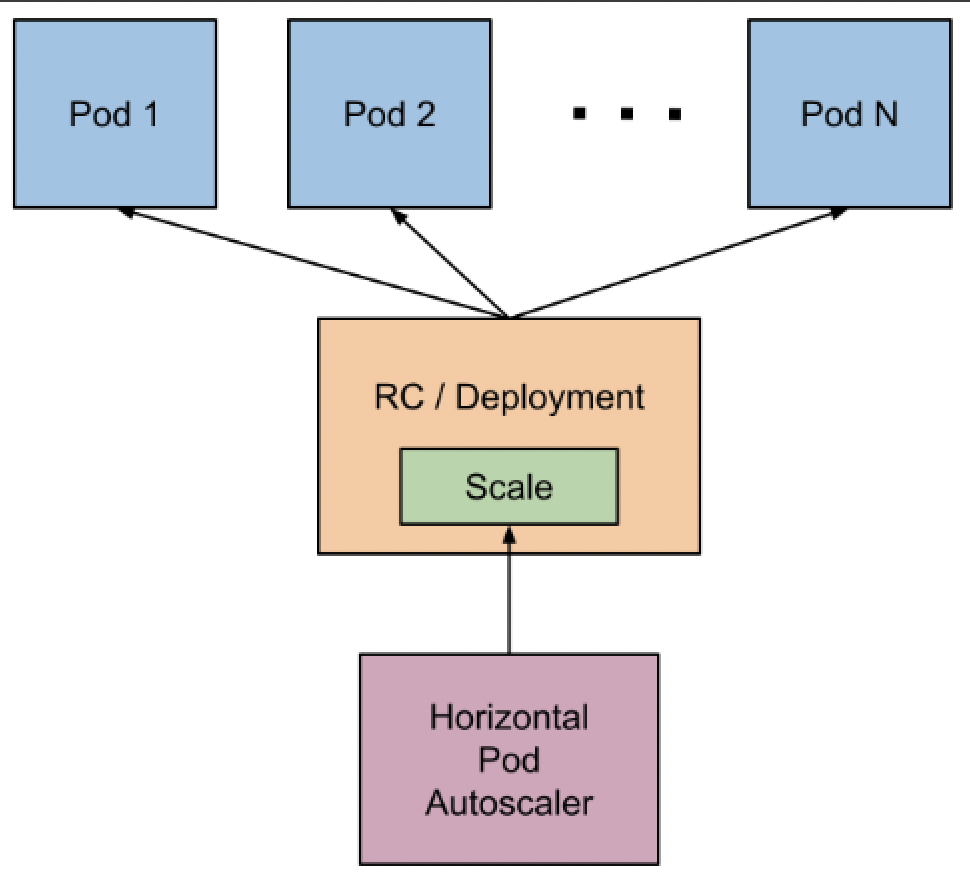
Horizontal pod autoscaler automatically scales the number of pods in deployment, a replication controller, replica set, or stateful set based on perceived CPU utilization.
Vertical pod autoscaling recommends suitable values to be set for CPU and memory requests and limits, and it can automatically update the values.
Cluster Autoscaler expands and shrinks the size of the pool of worker nodes. It adjusts the size of a Kubernetes cluster depending on the current utilization.
For example - In case of custom metrics that must be collected from an external source, then we need a solution that facilitates the way we get our metrics from our source (let's say RabbitMQ outside the cluster) and then create the required resources to scale pods based on those metrics. You can achieve this using KEDA (Kubernetes Event Driven Autoscaler)
Zero Downtime
Support zero downtime upgrades of your cluster and services by running them all in HA.
Use pod anti-affinity to make sure multiple replicas of a pod are scheduled on different nodes to ensure service availability through planned and unplanned outages of cluster nodes.
Use pod disruption budgets to make sure you have a minimal number of replicas up at all costs.
Conclusion
There is no denying that Kubernetes is the platform of choice for DevOps orchestration. In production, Kubernetes environments must meet availability, scalability, security, resilience, resource management, and monitoring requirements. So following these above-mentioned Kubernetes best practices is crucial to smoothly and reliably scaling your applications.
We have some interesting use cases that we have built on Kubernetes so please follow and stay tuned for the next blog on dynamic routing for our Machine Learning Pipeline.


.webp?width=352&name=Charles-Proxy%20(1).webp)


source on Google